Tutorials
Budget Kubernetes on Hetzner cloud with terraform
If you want to experiment with kubernetes or you want a simple and cheap solution, then you can create a single node Kubernetes cluster on Hetzner Cloud.
If you register on Hetzner with this url https://hetzner.cloud/?ref=Q8kG7vzgBaP0 you'll get a bonus of 20 euros.
What we'll do in this article will be a single server where we'll run Kubernetes on it with the help of Microk8s.
Usually, when you install kubernetes you'll need more servers, but for simplicity and for the personal usage, we'll use only one server.
Before we start installing microk8s and anything else, we'll have to build the infrastructure that will look like this:
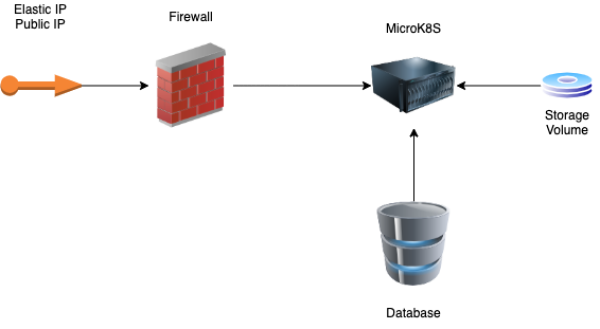
and for this we'll use terraform.
In the end, we'll have the following components:
- Elastic IP will be the public IP that you'll use for the DNS records on your domain registrar. You can also use the public ip of the server but this one will change if you rebuild the server.
- Firewall will be restrict the unwanted ports for the server and database. Will allow ports 80 and 443 to any ip for the k8s server and ports 3306 or 5432 for the database server from the k8s server only. Port 22 will be allowed for both server from each other and only from your own public IP.
- Microk8s server this will be the main server where you'll have your kubernetes installed. It will be an Ubuntu 20.04 server of type CX31 (8GB RAM and 80GB SSD) or you can choose type CX21 (4GB RAM and 40GB SSD)
- Database server will be the server where you'll have your database or databases. In this tutorial we'll install Postgres 13 but feel free to install what ever server you want.
- Storage Volume is an external volume where you'll keep your data (images, files, etc). The volume will not be deleted in the same time with your server. If you are used to AWS, then this will be exactly like a EFS volume.
You cannot attach a volume to multiple servers in the same time and this is one of the reasons why we'll use only one server for Kubernetes. If you want to attach the volume to multiple servers, you'll need to use NFS.
Since we already made an idea about what we'll build, let's start coding and create the terraform configuration for this infrastructure.
Let's create a directory infra and inside this directory you'll create your terraform files
# create infra directory
mkdir infra

# go into the directory
cd infra/
First, you'll need to configure the terraform provider. Let's create the infra/provider.tf file and add the following code inside:
terraform {
  required_providers {
    hcloud = {
      source = "hetznercloud/hcloud"
      version = "1.31.1"
    }
  }
}

provider "hcloud" {
  token = var.token
}
Then, you'll need to create a infra/variables.tf file with the following content:
variable "token" {
  sensitive = true
  default = "--your hetzner token here--"
}
To generate a new token, got to your Hetzner cloud page, select the project, click on Security (in the bottom-left sidebar) and then click on API Tokens. Click on Generate API Token and then make sure you select Read & Write permissions.
Since we are editing the variables file, let's add another variable that we'll use later and will specify in which location we want our servers to be. For the moment, Hetzner has only 3 options: Nuremberg, Falkenstein and Helsinki.
Add the following code to your variables.tf file after the token variable:
variable "location" {
  default = "hel1" // nbg1, fsn1
}
For this tutorial, I'll use Helsinki, but feel free to use any of the others if you want. You have the codes in the above example, commented.
The first resource we'll create, will be volume of 50GB. Feel free to use a different size that will fit your needs.
Create a infra/volume.tf file with the following content:
resource "hcloud_volume" "main" {
  name = "storage-volume"
  size = 50
  format = "ext4"
  delete_protection = false

  location = var.location
}
Now, let's create our volume, but first we need to initialize terraform. Run the following command in the termina inside the infra directory.
terraform init
The output should list the plugins that will be installed for your configuration.
Then, apply the terraform configuration to create your first resource:
terraform apply -auto-approve
Once you run this command, you will see what will be created:
Terraform will perform the following actions:

  # hcloud_volume.main will be created
  + resource "hcloud_volume" "main" {
      + delete_protection = false
      + format            = "ext4"
      + id                = (known after apply)
      + linux_device      = (known after apply)
      + location          = "hel1"
      + name              = "storage-volume"
      + server_id         = (known after apply)
      + size              = 50
    }
What happened here, was to create an external storage volume, formated as ext4 filesystem with the size of 50GB. Later, we'll mount it to our server.
You can go to your project's volumes page in hetzner cloud and you'll see there the volume you have just created.
But before that, we need to create our ssh key. Create a infra/ssh-key.tf file with the following content:
resource "hcloud_ssh_key" "main" {
  name       = "microk8s"
  public_key = file("~/.ssh/id_rsa.pub")
}
If you don't have a key already, then run this command in your terminal to generate one: ssh-keygen. Keep the default values and the password is not mandatory.
if you run the following command
terraform plan
it will show you that it will create a resource for you and the following lines will be displayed on your terminal:
Terraform will perform the following actions:

  # hcloud_ssh_key.main will be created
  + resource "hcloud_ssh_key" "main" {
      + fingerprint = (known after apply)
      + id          = (known after apply)
      + name        = "microk8s"
      + public_key  = <<-EOT
            ssh-rsa AAAA...
        EOT
    }

Plan: 1 to add, 0 to change, 0 to destroy.
Run the following command in your terminal to create the access key in your project's security page:
terraform apply
Running this command will show you the plan that will be execute and the resources that will create. It will also prompt you to type yes in order to create the resources. It will apply the plan only if you type yes. Typing something else or even y will cancel the action.
!Note! You'll be able to add only once the same key. If you duplicate this resource, change the name but add the same pub file, it will fail with a message telling you that you already have that key with the fingerprint you want to add.
At this moment, you should have two resources in your hetzner cloud project: a volume and a ssh key.
To make a secure SSH connection only with your computer, let's get the public ip from where you run the terraform commands. For this, create infra/data.tf file with the following code:
data "http" "icanhazip" {
  url = "http://ipv4.icanhazip.com"
}

locals {
  public_ip = chomp(data.http.icanhazip.body)
}
The data http resource will make a curl request to the url we specify in the definition of the resource and will have a body response with the ip address from where the request was made. The text will not be very clear, and for this we need to use the locale to create a local variable where we strip all the unwanted information for the IP.
You will need to run again the init command because you introduce the usage of a new plugin:
# install new plugin to get the public ip that you have
terraform init
Let's create the firewall rule for the kubernetes server.
Create a infra/firewall.tf file with the following content:
resource "hcloud_firewall" "k8s-server" {
  name = "k8s-server"

  rule {
    direction = "in"
    protocol = "tcp"
    port = "22"
    source_ips = [
      "${local.public_ip}/32"
    ]
  }

  rule {
    direction = "in"
    protocol = "tcp"
    port = "80"
    source_ips = [
      "0.0.0.0/0",
      "::/0"
    ]
  }

  rule {
    direction = "in"
    protocol = "tcp"
    port = "443"
    source_ips = [
      "0.0.0.0/0",
      "::/0"
    ]
  }
}
When you run terraform apply -auto-approve it will create a firewall with 3 rules:
- open port 22 only to your own IP
- open port 80 to any ip
- open port 443 to any ip
Now is time to add our first server.
Create the infra/servers.tf file and add the following code:
resource "hcloud_server" "kubernetes" {
  image       = "ubuntu-20.04"
  name        = "microk8s"

  server_type = "cx31" // cx21

  ssh_keys = [
    hcloud_ssh_key.main.name
  ]

  firewall_ids = [
    hcloud_firewall.k8s-server.id
  ]

  labels = {
    scope = "kubernetes"
  }

}
Before we create the server, let's make sure we attach it the volume to it. Open file infra/volume.tf file, remove the line with
--- infra/volume.tf
- location = var.location
+ server_id = hcloud_server.kubernetes.id
+ automount = true
The infra/volume.tf file should look like this:
resource "hcloud_volume" "main" {
  name = "storage-volume"
  size = 50
  format = "ext4"
  delete_protection = false

  server_id = hcloud_server.kubernetes.id
  automount = true
}
Now, run terraform apply -auto-approve to apply the changes: 1 to add, 1 to change, 0 to delete
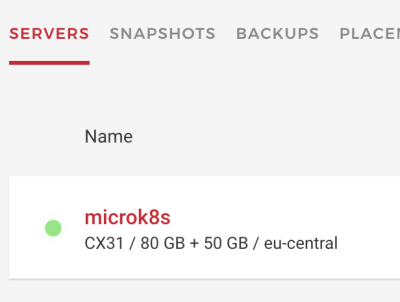
If you open the browser and go to Hetzner servers page on your project you should see something like this:
Yes, I know. In my example, the server itself has a bigger SSD than the volume we've just attached. But when you delete the server, that 80GB allocated to it will be deleted, while your 50GB volume will not be deleted.
Before we create the server for the database, let's create the firewall rules that will be attached to it.
In your infra/firewall.tf file add the following code for the database server:
resource "hcloud_firewall" "k8s-database" {
  name = "k8s-database"

  rule {
    direction = "in"
    protocol = "tcp"
    port = "22"
    source_ips = [
      "${local.public_ip}/32",
      "${hcloud_server.kubernetes.ipv4_address}/32",
    ]
  }

  rule {
    direction = "in"
    protocol = "tcp"
    port = "5432"
    source_ips = [
      "${hcloud_server.kubernetes.ipv4_address}/32"
    ]
  }
}
What we do here is to open port 22 for your IP and for the kubernetes server and port 5432 from the kubernetes server.
Run terraform apply to create the new firewall rule. You also can check in your browser to make sure it was created and the rules are there.
Let's configure the database server. Open infra/servers.tf file and add the following code:
resource "hcloud_server" "database" {
  image       = "ubuntu-20.04"
  name        = "database"
  server_type = "cx21"

  ssh_keys = [
    hcloud_ssh_key.main.name
  ]

  firewall_ids = [
    hcloud_firewall.k8s-database.id
  ]

  labels = {
    scope = "database"
  }
}
This server will be smallser 2GB RAM + 20GB SSD. It should be enough for personal websites or tests. But if you need a bigger server for the database because you'll have a lot of requests or a big database, feel free to change the type of the server with a bigger one.
The elastic IP (which is called Floating IP in Hetzner) is optional but good to have.
To create it with terraform, is as simple as creating infra/floating-ip.tf file with the following content:
resource "hcloud_floating_ip" "master" {
  type = "ipv4"
  name = "microk8s-server"
  server_id = hcloud_server.kubernetes.id
}
It will have to run the following command inside the micrk8s server after you assign the floating IP to it
sudo ip addr add <-floating-ip-> dev eth0
Once you have the floating IP configured, you can configure your DNS to point the records to it. You can use any DNS provider you want or even the one available at hetzner.
The costs for this setup will be as follows:
| Service | Monthly Price |
|---|---|
| Floating IP | 3.57 Euro |
| Volume 50GB | 2.38 Euro |
| Microk8s server CX31 | 10.59 Euro |
| Database server CX21 | 5.83 Euro |
| Total = 22.37 Euro / month |
If you followed this tutorial and want to delete the resources, run terraform destroy.
As a safety measure, to make sure that you don't delete the resources accidentaly, I recommend to add delete_protection = true to the volume, floating ip and database server resources in terraform. When you will want to delete them, first you'll have to disable the protection and then delete them.
The volume we've created earlier will be automatically mounted to the kubernetes server. It will be available at /mnt/HCVolume12345678. The numbers are the ID of the volume that you can find in the volumes page on Hetzner cloud.
You may use this directory without any problem, but if you delete the volume and create a new one, then the id will be changed and you'll have to change the path manually.
An alternative is to create a symbolic link to this directory with something more generic.
Let's connect to the micrk8s server as root user and run the following command:
ln -sv $(mount | grep Volume | awk '{print $3}') /mnt/nfs
This command will create a nfs symlink in /mnt directory which will point to your volume mounted path. They will both be on the same directory, inside /mnt, but you'll always use /mnt/nfs in your code. The nfs name can be changed to anything else. Here, we're not using NFS (Network File System). Feel free to use it on your own if you'd like to.
The configuration is done, let's install microk8s and postgres on the server